Showing posts with label cooking. Show all posts

Thursday, March 11, 2010

Be Safe


Yesterday one of my favorite blogs was talking about how she made her own coconut butter. I thought I too would give it a try and that is where my day took a drastic turn!

I tried making several batches of it yesterday - the first failed

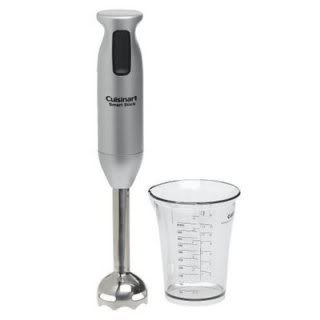
The second I got my finger stuck in the emulsion blender/stick blender.
Somehow while trying to clear the bottom side I accidentally pushed the button and the blade spun - right into my index finger and got hung up in the bone. LUCKLY my husband works nights and was home asleep. I woke him with quite a fright with the stick blender attached to my hand and he calmly cut the thing off my hand and was able to free my finger after about 30-40minutes. My finger is a horrible mess now, it really got chewed up and I have no feeling in it either.
So the lesson for today is ALWAYS unplug appliances before trying to do anything strange with them. I know that seems like common sense, but I have turned that blender stick over a million times and done the same thing and never had any problems before.

BE care...don't make a stupid mistake like I did. Who knew weight loss and a healthy diet could be so dangerous!?!?

Monday, February 22, 2010

Bread Recipe


The bread recipe I use I got from Mother Earth News. It is the 5 minutes a day artisan bread.

I made mine whole wheat but their are many variations in the book. The basics of the recipe are covered in the article as well as other tips.
Based on using whole wheat, each loaf is 600 calories, I got 10 slices (8 reg and 2 ends) from my loaf so the calories aren't bad at all - especially considering it's fiber content.


The Master Recipe: Boule
(Artisan Free-Form Loaf) Makes 4 1-pound loaves
3 cups lukewarm water
1 1⁄2 tbsp granulated yeast (1 1⁄2 packets)
1 1⁄2 tbsp coarse kosher or sea salt
6 1⁄2 cups unsifted whole wheat flour
Cornmeal for pizza peel


Mixing and Storing the Dough
1. Heat the water to just a little warmer than body temperature (about 100 degrees Fahrenheit).
2. Add yeast and salt to the water in a 5-quart bowl or, preferably, in a resealable, lidded container (not airtight — use container with gasket or lift a corner). Don’t worry about getting it all to dissolve.
3. Mix in the flour by gently scooping it up, then leveling the top of the measuring cup with a knife; don’t pat down. Mix with a wooden spoon, a high-capacity food processor with dough attachment, or a heavy-duty stand mixer with dough hook, until uniformly moist. Don’t knead! This step is done in a matter of minutes, and yields a wet dough loose enough to conform to the container.
4. Cover loosely. Allow the mixture to rise at room temperature until it begins to collapse (or at least flatten on top), approximately two hours, depending on temperature. Longer rising times, up to about five hours, will not harm the result. You can use a portion of the dough any time after this period. Refrigerated wet dough is less sticky and easier to work with than room-temperature dough. We recommend refrigerating the dough at least three hours before shaping a loaf. And relax! You don’t need to monitor doubling or tripling of volume as in traditional recipes.

5. Prepare a pizza peel by sprinkling it liberally with cornmeal to prevent the loaf from sticking to it when you slide it into the oven.
Sprinkle the surface of the dough with flour, then cut off a 1-pound (grapefruit-sized) piece with a serrated knife. Hold the mass of dough in your hands and add a little more flour as needed so it won’t stick to your hands. Gently stretch the surface of the dough around to the bottom on four “sides,” rotating the ball a quarter-turn as you go, until the bottom is a collection of four bunched ends. Most of the dusting flour will fall off; it doesn’t need to be incorporated. The bottom of the loaf will flatten out during resting and baking.
6. Place the ball on the pizza peel. Let it rest uncovered for about 40 minutes. Depending on the dough’s age, you may see little rise during this period; more rising will occur during baking.
7. Twenty minutes before baking, preheat oven to 450 degrees with a baking stone on the middle rack. Place an empty broiler tray for holding water on another shelf.
8. Dust the top of the loaf liberally with flour, which will allow the slashing, serrated knife to pass without sticking. Slash a 1⁄4-inch-deep cross, scallop or tick-tack-toe pattern into the top. (This helps the bread expand during baking.)
9. Slide the loaf off the pizza peel and onto the baking stone. Quickly but carefully pour about a cup of hot water into the broiler tray and close the oven door to trap the steam. Bake for about 30 minutes, or until the crust is browned and firm to the touch. With wet dough, there’s little risk of drying out the interior, despite the dark crust. When you remove the loaf from the oven, it will audibly crackle, or “sing,” when initially exposed to room temperature air. Allow to cool completely, preferably on a wire rack, for best flavor, texture and slicing. The perfect crust may initially soften, but will firm up again when cooled.
10. Refrigerate the remaining dough in your lidded (not airtight) container and use it over the next two weeks: You’ll find that even one day’s storage improves the flavor and texture of your bread. This maturation continues over the two-week period. Cut off and shape loaves as you need them. The dough can also be frozen in 1-pound portions in an airtight container and defrosted overnight in the refrigerator prior to baking day

Saturday, February 20, 2010

Sugar Free

This week my main focus has been to rid the last few items in my diet of sugar. Sadly I said goodbye to my friend {decaf} Coffee on Monday. Mainly because I don't enjoy it without sweetener and secondly I don't think it add anything to my health.

Last night I made up my first batch of 5-minute a day Artisan Bread! I baked one loaf this morning and it turned out beautiful! I tried a little end with some organic peanut butter and wow was that a treat! SO GOOD! Baking my own whole wheat, sugar free bread was something I'd been wanting to start for quite some time, I'm glad I tackled it last night!

I ordered a new swimsuit this week {for my water aerobics classes}. It arrive yesterday and I tried it on..LOVE IT. My 11yr old daughter told me I looked hot..LOL - KIDS!

Hope you are all having a good weekend - enjoy - see you Monday!

Wednesday, February 3, 2010

Good and Good for you!


I recently stumbled onto a great blog Love Veggies and Yoga. I love cooking and the blogger Averie provides so many yummy recipes and photos. I decided to pick a couple and give it a try. {yesterday's Kale chips were another idea from her blog}

I selected the High Raw Vegan Chocolate Chip Cookie Dough Balls Recipe here

The recipe was easy to follow, I had all the ingredients on hand and they turned out awesome!
I hope you will check out some of her amazing recipes and give one a try too. I've opened my mind to a whole new world recently and never knew what I was missing!

Tuesday, February 2, 2010

Oh Happy Day

Well today is Happy for a couple reasons...

Happy Groundhogs day
&
Happy Birthday to my sweet 16 daughter Katie!

Today I tried a new recipe - KALE CHIPS

I was reminded of reading of the idea as I strolled through the produce department, always looking for something new and unusual to try. Simple put you wash your Kale, tear the greenery from the stems in 2-3 pieces per stalk. Add them to a bowl with 2 tablespoons of olive oil and totally cover them all, tossing with your hands and kinda massaging them.

Place them on a baking sheet, spread out, sprinkled with salt and bake at 200 degrees for about 30mins. Keep an eye on them - cause they can pass from done to burnt pretty quick!
While they were cooking I was a bit unsure what they were going to taste like, as I wasn't sure the smell coming from the oven was edible...but to my surprise they are amazing! I look forward to having them with a sandwich tomorrow!

Monday, January 18, 2010

MLK day

(this was typed yesterday - but blogger wouldn't let me post for some odd reason)
It was a good day...Kids were home today for MLK holiday.
We just had pj day mostly...the weekend was kinda busy shopping.


I did cook a favorite healthy meal - Tilapia with blackened seasoning, butternut squash and Brussels sprouts. (which my youngest calls "Russel Sprouts")


This particular recipe for Brussels Sprout is our FAVORITE. I got it from the Jan issue of Clean Eating. (Brussels Sprouts with spicy almond glaze)
*******************************************************
Monday Workout:
1 water aerobic class (50mins)

Tuesday, January 5, 2010

Sugar in your Chili?


A few months ago I stumbled onto a can of DelMonte canned tomatoes "zesty chili style". You just add meat of your choice (turkey for me) and some beans and a few seasonings.
My husband requested I make it again so I went to the store to pick up the ingredients. As I strive to "Eat Clean" I routinely check labels. You can only imagine my SHOCK when I noticed these canned tomatoes had High Fructose Corn Syrup in them!!! Tomatoes? Really? WTH?!?!

So of course I checked what else was in there...chili powder, garlic, onion - no problem I can add that stuff myself. I grabbed 2 larger cans of diced petite tomatoes instead (checking the label - no sugar added!) and headed down the isle towards the beans.

I have been using kidney beans in the recipe, so I grabbed a can of those and just for good measure checked their label - WTH?!?! High Fructose Corn Syrup...in BEANS? What is going on here? Why would anyone want (or need) sugar in these beans! Needless to say - I put those babies back on the shelf, made a beeline for the dry beans section and got a nice, healthy bag of kidney beans (for 1/2 the price I might add) and just did a little extra cooking to have my bean sugar free!
Today's Workout:
5am - restarted my "Couch to 5K" podcast program - ran 2 miles - FELT GREAT!